
I don't know about anyone else, but I'm perfectly willing to admit I'm usually a baby when I'm sick. Which is to say, if I'm not dying then I like to be pampered. The few times I've been sick enough to be in the hospital I kvetched the whole time about how I was fine and really needed to go do XYZ right this minute.
3 days ago I got cold. So cold that if the temperature in the house dropped below 70 I would start shivering. I had a headache, but that wasn't really anything considering how little sleep I was getting trying to do everything I needed to do.
Last night I became violently ill, the temperature in the house was 75 degrees and I was shivering so hard my back was popping. Today I am exhausted. I am barely holding food, and I have developed a cough. Everything I have made the last 2 days has been thrown away. I keep my soap making as clean as possible. I wear gloves when I need to, I clean everything with 91% alcohol as I use it, I sterilize everything in my dishwasher and I use preservatives, but I would rather bear the brunt of unhappy people for delayed shipments than pass on viruses.
So what do I do when I have the flu? I sleep a lot - 12 hours so far since 3am. I curl up on the couch with a blanket, a bottle of water, a good movie and my dogs. And I try really hard not to freak out about the work piling up.
Hopefully the rest of you are healthy and doing well. I will hopefully be moving again by tomorrow.
Sunday, February 14, 2010
Thursday, February 11, 2010
Thud Thursday!
Ok, not quite yet. If I get everything I've set out to do today done, then I will thud later tonight.
I dreamed last night that my most recent supply order came in and I had 10 bars of every soap in the shop pre-made... it was a lovely dream. I was almost sad to wake up at 7:30 (before my alarm clock - YAY sunlight!) and realize it was just a dream.
But, these are the things I dream about. Go figure.

Right now I am living and breathing the shop trying to get new photos in there, new products listed (like the Cedarwood Lime Facial soap with French Green Clay!). I've got some great new products in the works, now I just need the time to get them all done!
Yesterday was a flurry of soap making and I even got a new one done for the Black and White Collection. If I get everything done this weekend I'll be working on the Viking Heart. I might get delayed on that a little bit though, I realized I'm dreadfully low on coconut oil, and probably only have enough for 4 or 5 more batches, which will more or less cover my upcoming consignment.
I hope everyone is having a fabulous day! And if you see this... come by and say hi on the Facebook Fan page. Become a fan.... I know a lot of people are leary of Facebook, but I'm so hoping it becomes a way for me to be able to interact with my customers on a more personal level. I like to talk, but sometimes one way communication is very difficult to manage.
 I hope everyone has a fabulous day!
I dreamed last night that my most recent supply order came in and I had 10 bars of every soap in the shop pre-made... it was a lovely dream. I was almost sad to wake up at 7:30 (before my alarm clock - YAY sunlight!) and realize it was just a dream.
But, these are the things I dream about. Go figure.
Right now I am living and breathing the shop trying to get new photos in there, new products listed (like the Cedarwood Lime Facial soap with French Green Clay!). I've got some great new products in the works, now I just need the time to get them all done!
Yesterday was a flurry of soap making and I even got a new one done for the Black and White Collection. If I get everything done this weekend I'll be working on the Viking Heart. I might get delayed on that a little bit though, I realized I'm dreadfully low on coconut oil, and probably only have enough for 4 or 5 more batches, which will more or less cover my upcoming consignment.
I hope everyone is having a fabulous day! And if you see this... come by and say hi on the Facebook Fan page. Become a fan.... I know a lot of people are leary of Facebook, but I'm so hoping it becomes a way for me to be able to interact with my customers on a more personal level. I like to talk, but sometimes one way communication is very difficult to manage.

Tuesday, February 9, 2010
Technical Tuesday! The Dilemma of Wholesale
There are a lot of discussions in the forums about wholesale. A lot of questions, and as many answers as there are people to give them. So while this isn't an in depth detail laden post, I'm going to venture to give my opinions on how I do wholesale and some generalized "rules" for wholesaling in general.
Rule #1: Don't Put the cart before the horse.
If you haven't done a thorough accounting of where and how you spend your money, what your supply costs are, what your overhead costs are and what your minimum profit margin is; do yourself a favor, and don't fret about doing wholesale. While wholesaling is a great way to get large sales all in one shot, and it can be a *great* way to get your business name out there, you're going to have a really hard time making a profit when the industry standard is a 50% discount off the MSRP.
Rule #2: Do the math.
In direct relation to Rule #1, as much as just about *everyone* hates spreadsheets (except possibly me because I'm a dork that way, and working on spreadsheets and symbolic logic problems are fun for me), they are indispensable for calculating your costs to the penny. They can be as simple or as complicated as you need them to be, but what it needs to track are:
Materials cost - each and every material you use. If you sew sock monkeys and each monkey requires 2 socks 1/2 spool of thread, 2 feet of sewing floss, 2 buttons and 8oz of stuffing (yes, i'm pulling these numbers out of thin air - I have no idea how to make a sock monkey)... then you need to account for all of those supplies. And don't forget the little stuff! Do you put a hang tag on your monkey? Do you print his name on it? Do you print it on a computer or do you print it by hand? Add in the cost of that tag, a couple cents for the ink. Do you sew a tag into your monkey with your brand/logo on it? Don't forget that too!
Fees and Advertising costs - are you selling retail on Etsy? If so, do you renew? Are you accepting payments via paypal? Propay? Odds are good you've got fees to pay for them. You need to build those fees into the final cost of your items. Do you advertise? How much, where? Is it free? Does it take time? Do you have to pay for your advertisement? Do you give out business cards? Do you give out samples? These are your advertising costs! Include them.
Salary - A touchy subject to be sure, but even if you're just doing this for fun, you should probably get at least a nominal sum for your hours. If you don't want to get paid for your work... my recommendation would be "Don't do wholesale". The reasoning is simple enough. Sooner or later you will resent working for nothing and if you started crafting because you loved it there is nothing worse than growing to hate it because everyone expects you to work your fingers to the bone for free!
Now... to give you an example so you can see how this works... (I am giving you numbers based on buying items from a local craft shop or random figures pulled out of thin air...this is just an example!)
Lets say you want to sell soap.
2lbs of soap base costs approximately $5
1 pack of 3 soap colors costs about $3
1 2oz bottle of mid-grade fragrance oil costs $6 - you'd use about .25oz to do 4 bars of soap... so $1.50
1 soap mold sheet to make 4 bars of soap will cost you about $9 - you can probably make 100 bars of soap before you break it... so about $.09
Shipping to have all of those items delivered to you costs $10 by UPS (yes, even excluding the soap mold)
So now you have everything you need to make 4 bars of soap.
so... add it all up... $2.5+$3+$1.50+.09 = $7.09
divided by 4 bars of soap = $1.78 per bar
Now... here's the kicker with soap, and I'd imagine with anything else - you want to stay competitive with your fellow sellers... so the market sets the price range. On soap the average is about $5 a bar.
So. Let's say we sell that soap at $5 a bar. We're making $3.22 per bar! (insert chorus of "i'm going to make soap because it sells so well and I can make loads of money!" here).
But wait! There's more! (Isn't there always?)
Now. You have to pay for packaging and labels. about .02 each (.02 for the packaging and .02 for the label)... You have to list it to sell it. .20 There are 76,000 listings in the bath and body category, so being new you have to renew your items about 4 times each on average to get them seen often enough to sell them at a fairly good clip. .80 cents there.
So.
$3.22 (after materials)
-.20 (listing)
-.80 (renewing)
-.04 (packaging and labeling)
= 2.18
then... finally! someone buys a bar of soap! yay! Now you have to pay 3.5% of that $5 to Etsy. Say goodbye to another .18 cents. And now we're down to $2.00 profit.
But wait, they're paying by Paypal! .30 is gone for the transaction fee and they take 2.9% of the $5 .15 ....
$2.00
-.30 (*transaction fee paypal)
-.15 (paypal %)
= $1.55 per bar.
So lets say you sell 8 bars of soap and you're making $1.55 per bar. You've made $12.40. Right?
But what about the electricity for the stove/microwave to melt the soap, the pipette you used to add the scent to the soap, the measuring cup you melted it in, the water and soap you used to wash it out afterward, the rubbing alcohol you used to get rid of the bubbles or sterilize the bowls and cups before use...
The fact that it takes about an hour to make those 8 bars of soap (including all time from beginning to packing it for shipment).
Oh wait! Shipping! You have to buy an envelope to ship it in, you have to buy business cards to put in there with it! You should probably have a thank you card of some type. You should possibly be printing off copies of the receipts, or including a handwritten copy from a receipt book. and and and and... all the little nit picky details come in...
But if you're wholesaling you don't have to do all of that right? So you save all of that money.
But you are selling for 50% of your retail. Because this is wholesale, and they expect you to sell them the soaps at $2.50 a bar!
So you don't have $12.40. You have $6.20 for 8 bars of soap and about 1 hour of your time... to say nothing of the time you spent promoting, and seeking out the wholesale account, developing your recipe, your design.
Now, I'm not trying to discourage anyone... but this is intended to show you that before you start worrying about doing wholesale... you really need to be in a place to buy your materials in large bulk amounts. You need to be at a point where you can make huge volumes to satisfy demand. And you need to be able to pay all the bills.
And if you're not there yet, don't worry. Telling someone who enquires that you are not able to do wholesaling right now, but you are grateful for their interest and hope that they will keep you in mind in 6-12 months (insert figure of how long it will be before you can wholesale if this is your goal). It's not a bad thing to not be able to wholesale. It's just not for everyone.
Next week I'll delve more into spreadsheets and how to determine what you should really be selling your items at if you're looking to make your craft into something you can earn a living with.
~Amy
Monday, February 8, 2010
Made It Monday with Wild Heather!
We've gone from necklaces to descriptions, and now rings! Amazing how well soap and jewelry go together! But, before I ramble too terribly much, here's a little bit about today's guest writer, Heather!(minor issues with pics, I will be adding them in again as soon as I can!)
I got started making jewellery about 4 years ago, after dabbling in lots of different crafting trends. At the time, I was working with a woman who used to make jewellery during mother/daughter ‘dates’ who would occasionally sell a few pieces.After carefully looking at the pieces I purchased, I thought, “I bet I can learn to do that!” I started picking up beading books in the library and bookstore and making note of the types and styles of beads, I liked.
That summer, I happened to be in my favourite bead store in Victoria BC, and I asked a helpful employee if she could make a pair of earrings for me if I picked out the beads. She informed me that if she put them both together for me, she would have to charge me a (rather steep) design fee, but if she helped me put one together and then watched while I put the other one together, there would be no charge! That was my first pair, and I have never really looked back. After about 3 months of making earrings for myself, people at work started asking me if I would sell them. The first week I started selling, I sold over 20 pairs of earrings! That co-worker that had inspired me to make my first pair bought three pairs from me!
I find making jewellery to be incredibly fulfilling. I am always challenging myself to learn new techniques and styles. I have gone from basic ‘cold process’ assembly (making earrings solely by putting together purchased components) to learning wire wrapping, ‘Viking’ knit woven chain and even silversmithing. Once you fire up that torch and watch the way the silver melts and fuses together, everything changes! I love working with semiprecious stones, freshwater pearls, and combining colours and textures. I hope people derive as much pleasure from wearing my jewellery, or from giving my jewellery as gifts, as I do from making it.
(Note: I was absolutely delighted to be asked to contribute to HeathensHearth’s blog on Make It Monday! I absolutely love every product of Amy’s that I have tried, but my very favourite has to be her Pink Sugar Goatsmilk soap. The lather is just ridiculous, and it feels like an incredible luxury to use, but it’s so good for my skin at the same time! The wonderful fragrance doesn’t hurt,either!!!)
So, without further ado, here's today's Made It Monday!
This post gives a before and after look at how I made a moonstone ring. Or rather, two rings. These are works currently in progress, and they were both created using materials purchased at http://www.capilanorock.ca/. The first ring is composed of silver wire, hammered for texture, a sterling bezel cup and this lovely moonstone. (The first part of this entry has already appeared on my blog, My Jewellery Box, which you can find at http://wildheather-handcrafted.blogspot.com/.)
The front view of the bezel cup and the ring shank. The ring shaft was crafted from sterling silver halfround wire, formed around a ring mandrel and then bent to meet the sides of the prepurchased silver bezel cup. I could simply have mounted the cup onto a perfectly circular band of sterling halfround wire, but what fun would THAT have been?

The view of the left side

The view of the right side

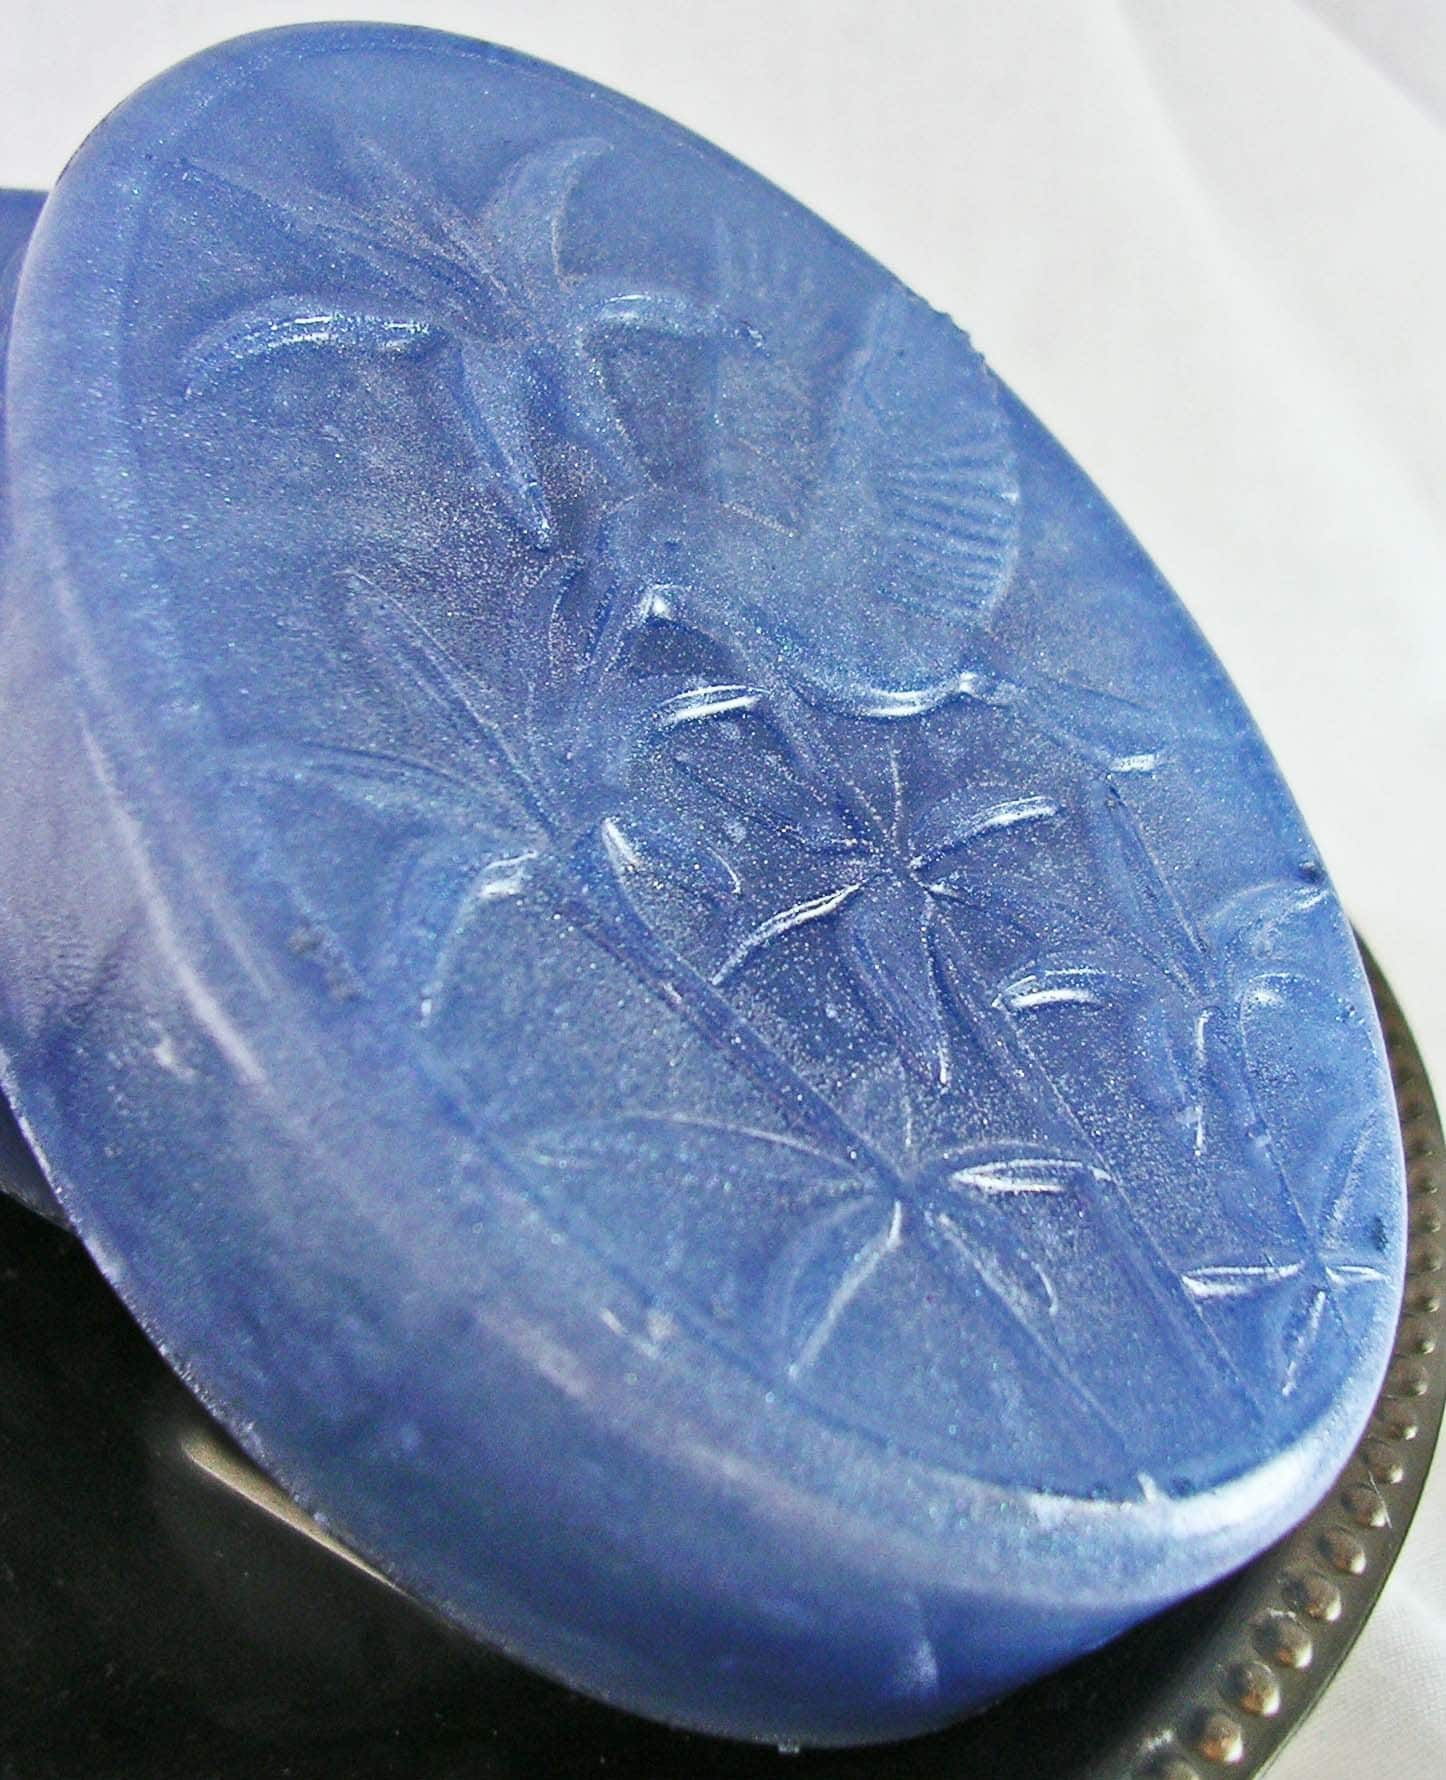
The lovely moonstone cabochon.

If I place the cabochon in the bezel cup before I solder it to the ring shank, I'll ruin the stone. If I simply place it in the cup, to show you all the effect, it can be difficult to remove. HOWEVER, I have a great tip for this, courtesy of Barrie Edwards. Simply drape a piece of dental floss (UNUSED, PLEASE!) across the bezel and drop the stone over it so that it lays behind the stone. Then Here’s what came next!

If I place the cabochon in the bezel cup before I solder it to the ring shank, I'll ruin the stone. If I simply place it in the cup, to show you all the effect, it can be difficult to remove. HOWEVER, I have a great tip for this, courtesy of Barrie Edwards. Simply drape a piece of dental floss (UNUSED, PLEASE!) across the bezel and drop the stone over it so that it lays behind the stone. Then Here’s what came next!
I painstakingly soldered the bezel cup into the ring shank, using flux, easy solder cut into TEENY little squares, and my handy little butane torch. Once the pieces were solidly joined, I filed away the excess solder using an emery file. Yup, a plain old acrylic nail grade emery file that I bought at the dollar store! Then I filed down the edges of the bezel cup to prep it for the stone.
I really wanted to make sure that the stone would sit solidly in the cup. I knew from fiddling with it beforehand that it was quite a tight fit, but I wasn’t quite willing to risk it dropping out. Before pushing the stone down into the cup, I cheated JUST a little. Using a toothpick, I dabbed a smidge of E6000 jewelry adhesive into the centre of the cup. Make sure (and I can’t stress this enough) that your studio is well ventilated when you use that stuff, and that you put the cap back on right away, or you may have trouble tying your shoes (or doing anything else requiring coherent thought) for the rest of the afternoon! The fumes are pretty potent. Then I applied gentle pressure to the stone to seat it in the cup.
After applying pressure for a few minutes, I applied pressure to the cup itself using a cute little tool from Grobet: it’s a bezel rocker. It allows you to form the sides of the bezel firmly around your stone. Here’s the final result!

I have already produced one custom version for a long-time fan who asked if I could do it for her in size ‘huge’. It was only an 8.5...I can make them up to size 15! The next one I make, though, I think I am keeping for myself, because it looks so great on my hand!

As a special thanks to Amy for featuring me today, I am going to send her a giveaway for readers: a pair of my Pick a Pearl earrings in either grey peacock, black peacock or pink! I’ll let Amy decide how to do the giveaway!
~~~~~~~~
YAY! Give aways! I think we'll do this nice and random! :) Tell me what kind of tutorials you'd like to see here, and next Sunday I'll select someone at random using random.org!
As a special gift, You can get 20% off at Wildheather's shop just by answering the following question:
What is her favorite product from my shop? If you answer the question correctly at checkout from her shop, you'll get 20% off your order!
Monday, February 1, 2010
Made it Monday with GalleriaDiGiani
So last weeks MIM was all about how to make a necklace... which was awesome! This week, John, from GalleriaDiGiani, is going to explain how to write better descriptions for jewelry! :-D I think a lot of these steps can also be used for other applications as well, so lets see what he's got to say!

How to Write Better Jewelry Descriptions:
Ok, so you have designed your merchandise, you have manufactured it, you have taken all the photos, uploaded everything, and now comes the hard part (for some). How on earth do I write a product description beyond just saying what the piece is? There are a lot of factors that go into deciding what to say about your piece.
1. Pick a few adjectives that might describe your piece. Is it fun and flirty? Bold and eye-catching? Classic and stylish? Wild and imaginative? Pick a few adjectives that describe how it feels to you. Right away, when people see a few adjectives, they start to tune into the personality of the piece, and can instantly think of times when they feel the same way, and can relate to how this piece will work for them at times like that, thinking "You know what? This is a fun and flirty piece, it would be neat to wear when I go clubbing with my girlfriends", and right away, they are picturing themselves wearing it.
2. Talk about how things coordinate with the basics. Think about all those basics that most women have; the jeans and t-shirt look, the little black dress, the white blouse and skirt look, etc. Can you see your piece being worn with multiple items in the basics? If so, discuss it. Let them know this piece makes a great transition from your jeans and t-shirt to you little black dress. Showing a piece's versatility is a big plus. If women can picture it matching multiple items, they are more inclined to wear it. If they can only picture it with that dress they wear once a year at the holidays, they will be less inclined to buy it.
3. Play up a certain aspect of the piece. If you are trying to describe a chunkier piece of jewelry, you can mention how well it goes with turtleneck sweaters. Since turtlenecks are often a fall and winter thing, though, be careful about making it a seasonal reference. Mentioning that it goes well with a turtleneck all winter long might not sell that piece in May. That might lead to "I will think about it and come back for it in October." Instead, throw in a few different references that span a whole year. Yes, it will work for turtlenecks, suits, it will dress up that power suit, go well with that long flowing summer dress, etc. Now, you have covered an entire year, and again shown the versatility. That's win/win.
4. Play up the type of stones used, if any. If you are using stones like amethyst, peridot, garnet, citrine, etc, and your piece is faceted, by all means discuss the facets. Faceting was done specifically to catch the light. That means that piece will catch someone's eye across the dance floor just as easily as it will reflect the candlelight from a romantic dinner. You have now just appealed to single and married women in the same description, so you haven't left anyone out. If the stones are opaque stones (tigers eye, lapis, onyx, etc), you can talk about how they not an overly dressy stone (depending on the piece you have them in), so they could easily be worn in a variety of situations (such as work) in which other gemstones might be too flashy.
5. Form and function. If you have pieces that serve a function on top of being just pretty jewelry, play that up, and give examples where you can. For instance, I have a line of magnifying glass pendants. While they are pretty, and a great throwback to a bygone era, they also serve a modern function. You can use them for antiquing, and inspecting for all those cracks and nicks that can reduce the value of something. You can use them on a night out, to assist with reading a menu. That means you can leave those reading glasses at home and have more room in your purse, which is a big help, especially if you are only carrying a clutch and need the room!
6. One-of-a-kind pieces. Oh, I cannot stress this one enough. Anytime you have a one of a kind piece, play that up! How cool is it to know that you will own a piece that no one else can own that will be quite like it. Those are the pieces that will get you noticed, those are the pieces that will have friends say "Wow, where did you get that??" Isn't that a special feeling when that happens?
7. Age appropriateness. Sometimes, buying things for teenage girls, or "mature" women can be difficult. Not all jewelry styles necessarily work for either group. If your piece is delicate enough, or simple enough, that you could see your teenage daughter/granddaughter wearing it, or your grandmother, make sure and point that out. Not everyone is good at buying the right thing. Answering a question like that for them in advance can be a big help.
8. Heirloom quality. Does your piece have that look of heirloom jewelry? Does it look like something that has been passed down through the generations (things like cameos, or antique brooches, things like that). If so, make sure and mention it. Having someone see that buying this piece could start a family tradition might be the final push they need to make that purchase. Aren't we all touched to see family traditions, whether in our own family, or in friends' families. How nice would it be to start one of your own?
9. Does your piece help someone overcome a problem they have with some jewelry? Lariat necklaces, by their very nature, do not have clasps. Sometimes, on longer necklaces (say, 24 inches or longer), people make them a continuous strand, with no clasp. If this is the case, you can definitely discuss that. Some women have trouble working clasps, for any one of a number of reasons. By reminding them that your piece has no clasp, and that it would be perfect for anyone who has trouble with clasps, you have just shown that you have solved their problem for them, and have created a piece with them in mind.
10. Sterling versus Fine Silver. Not everyone may know the difference between the two. If you are using fine silver in your pieces, make sure and point out that fine silver will take much longer to tarnish. Of course, if you have some sterling and some fine silver pieces, it is probably best to watch how you word it, so as not to discredit your sterling pieces. Perhaps say that even with the best of care, sterling might occasionally need to be cleaned, whereas fine silver will require much less maintenance in that regard.
These are just some of the things to take into consideration. If you start thinking in these terms, you will no longer be saying:
"This necklace is 18 inches long and is made of small lapis beads with a large lapis pendant. This necklace can be resized. Indicate size when ordering."
Instead, you can now say:
"This stunning necklace is made of small lapis beads, completed by a bold lapis pendant. This necklace can be the centerpiece of your jeans and t-shirt look, can set off your white blouse at the office, would look stunning with you little black dress for that special dinner (you know, the one where you want to dress up, but still feel a little casual). No matter what the outfit, this piece will get you noticed. No matter your mood (fun, classy, elegant, relaxed) you will find many opportunities to wear this almost anywhere, and it will become the piece in your collection that you come back to over and over again."
I hope I have helped.
Giani
Sunday, January 31, 2010
Say It Sunday - The 3000th Item Sold Edition!
Wooo! It's Party Time!
Heathen's Hearth got its 3000th Etsy sale last night! A big thank you goes out to all of my customers over the last year and a half! This landmark wouldn't exist without you! And a very special thank you to Pixiebell for being the one to get me to that lovely number!
So now there are questions.
1. How to celebrate?
2. How to keep it going.
To answer the first... I think i'm going to have a 30% off sale.. :) I'll have to work on that. In the meantime there is a discount section in the shop.
To answer the second... I'm currently working on a consignment order for a shop in Pennsylvania, I have 2 shows lined up - 1 in illinois, and 1 in upstate new york... I have about 2 dozen new scents to get into the shop, and lots of new products lined up... including a fabulous new Paraben Free lotion that will be a blend of the best of my whipped body frostings, with the convenience of being able to ship it year round!
:-D lots of new stuff to do... so I think I'm going to go get started!

Hat's off for the Party! (thank you Danilykewoah)
Saturday, January 30, 2010
Slacking Saturday!
So I completely neglected the blog this week. My bad! This was quite a week though. 1 almost failed batch of soap (yay hot process and friends with quicker brains than me!) 1 batch that just absolutely exploded (NEVER make soap when frustrated), and busily trying to catch up after a very frustrating week.
Tuesday my aunt and cousin were in a head on collision car accident (no one was too badly injured) when 3 kids stole a car and went joyriding. 3 cars totally wrecked and countless other episodes of hairy carey.
I am attempting to solidify my social networking to allow more time for keeping in touch. I have set up a new fan page for Heathen's Hearth - so stop by and become a fan! Join the mailing list and you can get a coupon for a free bar of soap.
I plan on taking down the standard facebook page for Heathen's Hearth no later than February 15th.
It's barely afternoon and its already a day today. Blah. I'm totally slacking today. Guess its a good thing the weekend has 2 days. I've always been the first to admit I'm a little backward when it comes to doing things and snow is no different. It makes everyone else so happy... just makes me miserable.
I did manage to get one new listing up today before photoshop crashed on me though. I'm sooo looking forward to spring!
Subscribe to:
Posts (Atom)


